


A Google Tag Manager container acts as a gateway to your hotel website for loading tracking scripts and other functionality – If GTM is unfamiliar to you, take a look at our introductory article which will take you through the concept. By using a GTM container, hotel marketers can be the ones to deploy new tools and setup tracking as opposed to the development team, increasing the agility of hotel marketing teams to try new things and track anything they choose. A standard Google Analytics implementation is a great start to tracking but is quite limited in measuring micro-conversions, (i.e. hovers, search, clicks, intention etc.) yet it is only by understanding the micro, that we can effectively optimise the macro conversions such as enquiries or room bookings. Here is a quick example of how to use GTM to deploy your own click tracking.
What are custom events?
If you’ve every wandered into Google Analytics and found a tab called ‘Events’ (sitting under ‘Behaviour’ or ‘Real Time’) you may have seen a blank set of information. This is because Google Analytics does not do event tracking out the box, it needs to be set up which is what we’re going to do here. An event in Google Analytics is made up four components, Category, Action, Label and Value. Examples of what this are might as follows:
- Category – Room Booking Funnel
- Action – Click Availability Search
- Label – Room Name
- Value – £120
It is really important that we plan how we’re going to categories our events ahead of time otherwise it’ll be very confusing as we add more and more events for different user journeys going through different buying funnels. Here is a template to help you get started with the events.
Installing Google Tag Manager on your hotel website
After setting up a Google Tag Manager account you will be asked to create a container – this is a very apt description for it as it is going to hold all of our triggers, tags and variables (more on this later) and inject it into the website. The key step here is to insert the container code into the header of you website which you will probably need access to a developer for. Once complete, we’re ready to start setting up the event tracking.
Triggers, Tags and Variables
Google Tag Manager uses these three components to operate. Think triggers like a ‘when’ something happens, tags are a ‘what’ is going to happen and variables as a handy way to store information that we can reference later. Examples might be:
Trigger – When someone clicks on the search button on our website
Tag – Send an event to Google Analytics
Variable – A variable that we’ve used to store the value of the room so we can associate it with our event.
Setting up variables
The first step is to set up a variable with our Google Analytics settings. Follow these steps:
- Click Variables > New > Google Analytics Settings >
- Add your Google Analytics tracking ID (UA-XXXXXXXXXX) and press save
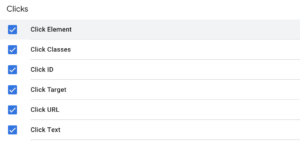
- Enable a bunch of pre-made variables that come with GTM. They are not all enabled by default and we’ll need to use some of them in our trigger later so head to the variables page again, click Configure on built-in variables and enable the following:
Now we have our Google Analytics settings stored as a variable and also have access to all the additional pre-built GTM variables. Great!
Set up your first trigger
Now that the stage is set, we need to create a trigger. This is going to listen for certain actions and inform our tag when it needs to fire. Triggers can be as simple as a page view, or can be as complicated as a specific series of customer interactions involving clicks, hovers, scrolls etc. In this instance, we’re going to set up a trigger for clicks on a particular button.
- Click New Trigger
- Give it a name
- Choose the trigger type, in this instance we’ll choose “All Elements”
- Choose “Some Clicks”
- Head over to our website to find the ID of the button. This can be done by taking a quick peak at the inspect element part of the browser. As you can see, our contact button has the ID “nav-contact” – let’s remember this for step 6
- Back in GTM, choose “Click ID”, “Equals” and then type in “nav-contact”
- Press Save
What we have done here is created a trigger that is going to fire when a user clicks on a button with the ID “nav-contact”. Now we can set up our tag which will be used to tell Google Analytics what is going on.
Setting up Tags
Our trigger gives us the ‘when’ so now we need to set up the ‘what’; we need to setup the functionality that happens when a trigger is fired. Let’s first head over to Tags and do the following:
- Click “New”
- Give it a name
- Select your trigger that we just set up in the previous step.
- Click the tag configuration and choose “Google Analytics – Universal Analytics”
- Select Track Type “Event”
- Enter Category, Action, Label and Value that we planned earlier
- Choose our Google Analytics Settings variable that we set up earlier
- Press Save
Now it’s time to test! We can head over to Admin and preview if it is working or not. Click the preview button and then head head over to your website – you should see a panel at the bottom of the screen which will tells us what tags have fired, values of the data layer, events etc. This is when we should be able to click the necessary button and we’ll be able to see in the panel if it has triggered or not. Furthermore, we can take a look at Google Analytics and check if the event has successfully been registered!
Moving forwards
We should now have an event tracked in Analytics. This is the first of many you are going to want to tracks the real value of this comes when we track the entire user journey, top to bottom for each and every revenue stream. This level of tracking positions the website really well for adopting a Growth Driven Design methodology which uses the data collected to hypothesise and test new evolutions in the user journey and web experience.
If there are any questions on the above or if you get stuck at all, please just shout and we’ll be happy to help!